MPC Kit Reviews
About the Reviewer:
Fred Nardei Jr. was given one of each MPC rocket kit available at Sky High Hobbies to build and provide feedback to the rocketry community in the following reviews. Fred comes with the right credentials to both build and provide reviews. Co-founder of PCME magazine, once rated the 3rd most popular on line magazine, Fred is no stranger to writing reviews, having written hundreds of reviews of PC games, hardware, and software. Combining his ability to write product reviews, and his love of model rocketry since the 4th grade, Fred's reviews are both informative and educational. I hope these reviews will help you in choosing the right kit.
MPC LUNAR PATROL
Skill level: 3
THE KIT:
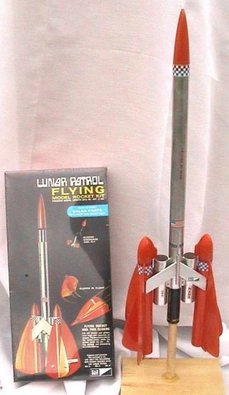
The Lunar Patrol rocket from MPC is one of the most unique and interesting rockets I’ve ever built. It’s one of the Mach 10 series of kits. In addition to having two 7inch gliders the booster uses two tubes and two modified delta wings instead of conventional fins. The tube and delta wing fins also serve as the mounts for the gliders.
It’s not an easy kit to build. It’s designed for the advanced modeler. If you’re up to the challenge though, you’ll have one of the coolest looking rockets you’ve ever owned or seen, and your friends are sure to be envious.
It’s a shame this kit is out of production. Sure, there are lots of model rocket kits that have gliders that detach at apogee, but none are quite like this one. It’s silver and bright orange paint scheme not only looks great it helps you see and track its three aircraft.
The Booster rocket has a plastic nose cone, and the gliders have balsa cones and nose weights. The booster has parachute recovery and the gliders are engineered for long slow gentle spiral descents.
BUILDING IT:
The engine mount on this kit has an easy release clip and an engine block. These were glued into place and allowed to dry. Then the completed assembly was pushed into the 12” long booster tube with a liberal amount of glue which is smeared inside the booster tube first. The engine mount should be flush with the end of the booster tube.
As this was drying I measured and marked the 3 inch side fin tubes so that they would extend exactly 1 inch from the end of the booster rocket. Mounting these side fins to line up perfectly is easily done by running a 2 inch line of glue up opposite sides of the booster tube. Make sure the engine clip is offset. I laid the side tubes into the glue, making sure the one inch marks were lined up with the end of the booster tube. The entire assembly was then laid on a flat surface that was covered with wax paper. Make sure everything is laying flat and the alignment with be right on.
As this was drying I started on the modified delta fins. These fins lay flat across all 3 tubes. One on each side. They extend past the sides of the side tubes to serve as a cradle for the glider bodies. Each delta wing is composed of two trapezoidal pieces of balsa stock which are sanded feathered and glued together to form a chevron. Once each of the 2 chevron’s sides were glued together I added more coats of glue to the seams, smoothing and sanding between coats to get a good strong bond. Once these were finished they were glued to the rocket so that the seam was aligned with the centerline of the booster and so that the leading tip is even with the leading edge of the side tubes. These delta fins should extend past the sides of the side tubes evenly on both sides. To complete the booster, the launch rod guide tube was glued into the one of the delta wings seams. I used a sharp razor to carve a shallow V channel in the seam for a neater and stronger fit.
Next the gliders were built. This of course is the toughest part of this rockets assembly. None of the balsa stock is die cut and the wings of the gliders are curved and only the glue edges are straight cuts. Once I carefully cut out the gliders wings and rudders they were pinned and sanded to insure that all of them were of identical size and shape. Ailerons are cut from the trailing edges of the wings and these were also pinned and sanded. The rudders were given compound leading edges, and all but the glue edge of the wings and ailerons were sanded into nice aerofoil shapes. A card stock template for getting the wing dihedral and aileron angles correct ,is included, and was cut from its sheet. If you have some extra balsa stock you might want to make balsa templates like I did. They are less prone to bending and make fitting with wings a bit easier.
The wings were glued on first, using the dihedral template, and once dry, the rudders were installed. The ailerons were then glued on using the angle template to get them on correctly. I increased the angle on one aileron on each of the gliders to get a nice spiral flight on their way down. This is optional and not mentioned in the instructions.
The mounts for the gliders are glued to the nose cones. They consist of a small curved piece of flat balsa that has a ½ inch of balsa dowel glued to it. This two piece assembly is glued to the side of the nose cones. Once they were well glued and dry I sanded them to seem as if they flowed into the nose cone like it was all one piece. A small sanding drum on a dremel is perfect for this. The nose cone is then glued into the glider body tube so that the dowel mount is lined up between the wings on the underside. To complete the glider mounts, small lengths of launch rod guide tubes are glued inside the booster rockets side tubes, as far outboard as possible. When everything is lined up correctly, the glider bodies, when mounted, should lay flat along the side tubes with the booster’s delta wings cradling the glider body.
I finished up by building the parachute and mounting the shock cord. Everything was given another good sanding and prepped for paint. A couple good coats of clear coat first, or using some other sanding sealer, will not only save you some paint, but it also helps get a nice smooth finish for better aerodynamics.
KIT FEATURES:
This kit comes in a cardboard box and does not have any plastic or vacuum formed detailing parts. They are not needed nor wanted if this bird is going to fly, and not just sit on display. There are two sheets of waterslide decals to dress up both the booster rocket and both gliders. This rocket also comes with a block of permanent flameproof wadding and a 6 sided 10 inch parachute.
As mentioned this is a very challenging kit. It takes some skill and patience, and fin jigs and guides are useless on this kit. Do a good job building this rocket and you will have the pride of your collection and the envy of your rocketeering friends.
MPC Taurus-1
Skill 1 Length: 9” Dia: 0.591” weight: 11grams
THE KIT
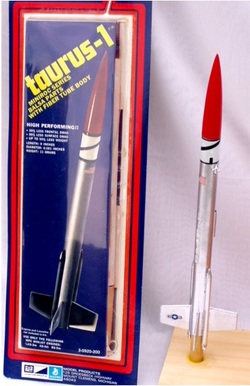
The Taurus-1 model rocket kit is one of the MPC Miniroc series of rockets. It uses the smaller 13mm minijet type rocket engines. It was designed as both a sport rocket and a high performance competition rocket. Which type it classifies as is dependant on whether you build it with or without the side booster rockets that are included with the kit. Its appearance resembles the much larger NASA Mercury Redstone rockets but it is not a true scale replica.
When this kit was in production John M. Kennedy used a booster less version of this rocket to set an all time altitude record for model rockets while flying on an A3-4m minijet type engine. He flew his Taurus-1 to over 660feet.
BUILDING IT
The Taurus is a simple kit to build with balsa fins and nose cone, and a fiber body tube. There are 4 small balsa fins and 2 small booster rockets. The booster rockets must be assembled from the 2 included T-5 fiber tubes and from plastic nose cones and engine nozzles that are included. The instructions are easy to follow and well detailed. I start by building the engine mount which is a simple 2 piece affair consisting of an engine tube and an engine block. Once the engine blocks glue has set, the engine tube with the block is inserted flush with the end of the booster tube. While the glue for the engine block is setting the lines for the 4 fins are measured and drawn. I use marking guides but a paper guide can be cut out from the instruction sheet and wrapped around the rocket’s booster tube. It’s important to always get the fins identically sized. I do this by carefully cutting them from the balsa stock and then pinning them together. This way they can be sanded without worrying about them slipping out of place as you’re sanding. Once they are all sanded to equal size I unpin them, sand the flat sides smooth, and then sand sharp compound angles into the leading and trailing edges. The mounting edge of the fins are one by one given a light coat of glue and then mounted to the booster tube. Once they are all aligned correctly and the glue is set, I then start a series of 3 coats of glue fillets. These are applied by running my finger down each fin/tube joint while it’s filled with glue. To mount the small side booster rockets, for each T-5 tube I used plastic cement to glue the nose cones and engine nozzles on the thin tubes. I marked each one so that exactly 1 inch of the rear of each side booster rocket protrudes from the Main Tube. I then added thruster nozzles to the main tube. These are included along with other plastic detail parts that can be added optionally. The shock cord of this kit is just plain string. It is mounted to the inside of the main tube with a piece of cardboard stock that has 3 holes in it. The string is threaded into this card stock and then glued into the tube far enough in that it will not interfere with the nose cone. It’s actually a stronger connection type than the typical Estes and Custom method of folding the shock cord into a tri folded piece of regular paper. The nose cone is as mentioned, balsa. A small eye screw is included like any other balsa nose cone kit. This is screwed into the center of the bottom of the nose cone and then removed. A drop of glue is put into the hole and then the screw is screwed back into the nose cone tight. The Taurus-1 uses a 10inch 6 sided parachute for its recovery. This is a bonus in my view, as most rockets of this size only use a streamer for recovery. I recommend using a small dab of glue in the chute gripper tabs to make sure that this 30+ year old parachute doesn’t separate from its shroud lines during descent. Each shroud line is inserted into a hole in a small rectangle of single sided tape. The shroud line is then folded over on the sticky side and then the not so sticky side of the tape is folded over the edge of the parachute corners. Instead of tying the parachute directly to the nose cone screw I tie it to a latching swivel hook so that it can be mounted and removed after flights. Since it is such a high flyer a metallic silver or other very bright color is recommended for the finished rocket so that it can be more easily seen.
KIT FEATURES:
One of the nicest features of this kit are 2 plastic sprues of customizing detail parts. The booster rocket nose cones and the engine’s nozzles are on these sprues as well as several other cool little parts that can be used to really customize your Taurus. Parts such as side thruster nozzles, engine shrouds, antennas, tracking flares and others, allow you to make your Taurus as wild or mild as you want. For even more detailing options the Taurus comes in a cardboard backed plastic blister pack. Incorporated in the plastic blister itself are many vacuum formed customizing detail parts. These can be carefully cut from the blister, trimmed and then glued to the rocket to simulate things such as cable shrouds, vents, scoops, pilot canopies and the like. Be sure that if you use these parts you only use Enamel paints for finishing your rocket.
The decals for this rocket are the water slide variety. Included are black and white “roll pattern” decals. Like the real rockets flown by NASA, these permit photographic analysis of the rolling or spinning of the rocket.
Like all MPC rockets this one is a blast to build and fly. Its ease of assembly makes this a great first build, starter rocket, which can also be used for competition.
THE KIT
The Taurus-1 model rocket kit is one of the MPC Miniroc series of rockets. It uses the smaller 13mm minijet type rocket engines. It was designed as both a sport rocket and a high performance competition rocket. Which type it classifies as is dependant on whether you build it with or without the side booster rockets that are included with the kit. Its appearance resembles the much larger NASA Mercury Redstone rockets but it is not a true scale replica.
When this kit was in production John M. Kennedy used a booster less version of this rocket to set an all time altitude record for model rockets while flying on an A3-4m minijet type engine. He flew his Taurus-1 to over 660feet.
BUILDING IT
The Taurus is a simple kit to build with balsa fins and nose cone, and a fiber body tube. There are 4 small balsa fins and 2 small booster rockets. The booster rockets must be assembled from the 2 included T-5 fiber tubes and from plastic nose cones and engine nozzles that are included. The instructions are easy to follow and well detailed. I start by building the engine mount which is a simple 2 piece affair consisting of an engine tube and an engine block. Once the engine blocks glue has set, the engine tube with the block is inserted flush with the end of the booster tube. While the glue for the engine block is setting the lines for the 4 fins are measured and drawn. I use marking guides but a paper guide can be cut out from the instruction sheet and wrapped around the rocket’s booster tube. It’s important to always get the fins identically sized. I do this by carefully cutting them from the balsa stock and then pinning them together. This way they can be sanded without worrying about them slipping out of place as you’re sanding. Once they are all sanded to equal size I unpin them, sand the flat sides smooth, and then sand sharp compound angles into the leading and trailing edges. The mounting edge of the fins are one by one given a light coat of glue and then mounted to the booster tube. Once they are all aligned correctly and the glue is set, I then start a series of 3 coats of glue fillets. These are applied by running my finger down each fin/tube joint while it’s filled with glue. To mount the small side booster rockets, for each T-5 tube I used plastic cement to glue the nose cones and engine nozzles on the thin tubes. I marked each one so that exactly 1 inch of the rear of each side booster rocket protrudes from the Main Tube. I then added thruster nozzles to the main tube. These are included along with other plastic detail parts that can be added optionally. The shock cord of this kit is just plain string. It is mounted to the inside of the main tube with a piece of cardboard stock that has 3 holes in it. The string is threaded into this card stock and then glued into the tube far enough in that it will not interfere with the nose cone. It’s actually a stronger connection type than the typical Estes and Custom method of folding the shock cord into a tri folded piece of regular paper. The nose cone is as mentioned, balsa. A small eye screw is included like any other balsa nose cone kit. This is screwed into the center of the bottom of the nose cone and then removed. A drop of glue is put into the hole and then the screw is screwed back into the nose cone tight. The Taurus-1 uses a 10inch 6 sided parachute for its recovery. This is a bonus in my view, as most rockets of this size only use a streamer for recovery. I recommend using a small dab of glue in the chute gripper tabs to make sure that this 30+ year old parachute doesn’t separate from its shroud lines during descent. Each shroud line is inserted into a hole in a small rectangle of single sided tape. The shroud line is then folded over on the sticky side and then the not so sticky side of the tape is folded over the edge of the parachute corners. Instead of tying the parachute directly to the nose cone screw I tie it to a latching swivel hook so that it can be mounted and removed after flights. Since it is such a high flyer a metallic silver or other very bright color is recommended for the finished rocket so that it can be more easily seen.
KIT FEATURES:
One of the nicest features of this kit are 2 plastic sprues of customizing detail parts. The booster rocket nose cones and the engine’s nozzles are on these sprues as well as several other cool little parts that can be used to really customize your Taurus. Parts such as side thruster nozzles, engine shrouds, antennas, tracking flares and others, allow you to make your Taurus as wild or mild as you want. For even more detailing options the Taurus comes in a cardboard backed plastic blister pack. Incorporated in the plastic blister itself are many vacuum formed customizing detail parts. These can be carefully cut from the blister, trimmed and then glued to the rocket to simulate things such as cable shrouds, vents, scoops, pilot canopies and the like. Be sure that if you use these parts you only use Enamel paints for finishing your rocket.
The decals for this rocket are the water slide variety. Included are black and white “roll pattern” decals. Like the real rockets flown by NASA, these permit photographic analysis of the rolling or spinning of the rocket.
Like all MPC rockets this one is a blast to build and fly. Its ease of assembly makes this a great first build, starter rocket, which can also be used for competition.
Microsonde 3 Payloader
Skill 3
THE KIT
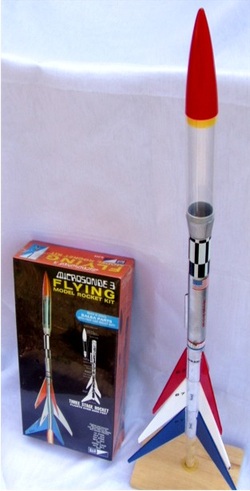
The MPC Microsonde 3, is a 3 stage rocket capable of attaining heights of more than 2000feet. It’s one of the Mach 10 series of MPC rockets. It has a clear plastic payload bay for carrying electronics or experiments aloft. The first and second stages of this rocket have tumble recovery and the main booster tube has a parachute. Take your time when building this rocket and it will be one of the most prized rockets in your collection.
If you build it in a rush you will end up with a clumsy looking rocket that will be even more clumsy in flight.
BUILDING IT:
I started this kit by building the engine mounts first. Pay close attention to the measuring and placement of the engine tubes into the booster tubes. They serve as tube couplers as well as engine mounts. Only the third stage has an engine block in its engine mount tube. As the glue was drying on the motor mounts, I marked out the fin lines on the body tubes. This is best accomplished by putting all of the stages together and then measuring out, and drawing the fin lines down the entire length of all of the tubes/stages at the same time. A paper fin template can be wrapped around the body tubes to mark out their positions, but I use the plastic Estes fin marking guides. Once this was done I started working on the fins. The fins were carefully cut from the balsa stock. The balsa isn’t die-cut so they require more care in cutting them from the balsa sheets. Use a straight edge like a ruler to get nice straight uniform cuts. Once they were all cut out I pinned together the 3 fins from each of the 3 stages. When they were pinned together I sanded the 3 fins from each of the 3 stages together, till the fins for each stage were all identically sized. When each set of fins were sanded to be identical they were unpinned and the flat sides were all sanded smooth. Then all of the fins edges, with the exception of the glue edge, were sanded into compound angled edges to cut the air better. When mounting the fins on this, or any other, multistage rocket, I’ve found that it is best to do it while all of the stages are fitted together. I start with the last stage and work my way up the rocket. When all of the fins are secured to the last stage I move to the next progressive stage making sure each fin is lined up with the fin behind it. This makes for a very neat and precise appearance. It also insures that the rocket will have very stable flights. Once all of the fins were secured to the body tubes I go back and lay in glue fillets with a glue covered fingers. I make sure there are 3 good coats so that it is a good strong bond holding the fins on.
It’s crucial to get the engine mounts/tube couplers seated to the proper depths or else the stages of the rocket won’t fit together properly. The instructions do a good job of outlining the dimensions for the proper fit of these components. They should extend exactly 3/8ths of an inch from the body tubes.
In addition to being a multistage rocket the Microsonde also has a payload bay. The payload bay is a clear plastic tube slightly larger than the body tube. The nose cone and the reducer are plastic as well. These were assembled with a good quality clear plastic cement. Don’t use white or wood glue for these connections. The nose cone must be left unglued for access to the payload bay. If it is at all a loose fit, wrap the shoulder with clear scotch tape till it fits snug.
I completed assembly by gluing the shock cord in and then putting the parachute together. I decided to go with a multicolor paint job. The body and staging tubes were painted a bright metallic silver. The fins on the first stage were painted blue, the second stage fins are white, and the third stage sports fins that are red. The nose cone was painted red to match the third stage fins.
KIT FEATURES
This rocket kit comes with some nice features not found on many of the other MPC kits. It can attain heights as high as 2000 feet. The shock cord on the Microsonde 3 is an elastic one. It is threaded through 3 holes on a small rectangle of card stock and then glued into the body tube far enough in so that it will not interfere with the payload bay/nose cone. In addition this kit comes with a block of permanent fireproof wadding. Because the kit comes in a cardboard box, it doesn’t have the extra vacuum formed detailing parts that the kits that come in the plastic packaging do, It has plenty of waterslide decals to fill out all 3 stages. It has a 10inch 6 sided parachute and comes with a separate instruction sheet that has directions on how to set up the engines for multistage flights. It also comes with a count down and safety card, and like all other MPC kits it has a couple of “if found please return to” stickers.
The assembly of this rocket can be tedious and time consuming, but when it is built with patience and care it will be one of the nicest rockets in your collection. It’s not really that difficult to build. If you take your time, and line up the fins carefully with the fins on the previous stage, you will have one great looking, and performing rocket.
THE KIT
The MPC Microsonde 3, is a 3 stage rocket capable of attaining heights of more than 2000feet. It’s one of the Mach 10 series of MPC rockets. It has a clear plastic payload bay for carrying electronics or experiments aloft. The first and second stages of this rocket have tumble recovery and the main booster tube has a parachute. Take your time when building this rocket and it will be one of the most prized rockets in your collection.
If you build it in a rush you will end up with a clumsy looking rocket that will be even more clumsy in flight.
BUILDING IT:
I started this kit by building the engine mounts first. Pay close attention to the measuring and placement of the engine tubes into the booster tubes. They serve as tube couplers as well as engine mounts. Only the third stage has an engine block in its engine mount tube. As the glue was drying on the motor mounts, I marked out the fin lines on the body tubes. This is best accomplished by putting all of the stages together and then measuring out, and drawing the fin lines down the entire length of all of the tubes/stages at the same time. A paper fin template can be wrapped around the body tubes to mark out their positions, but I use the plastic Estes fin marking guides. Once this was done I started working on the fins. The fins were carefully cut from the balsa stock. The balsa isn’t die-cut so they require more care in cutting them from the balsa sheets. Use a straight edge like a ruler to get nice straight uniform cuts. Once they were all cut out I pinned together the 3 fins from each of the 3 stages. When they were pinned together I sanded the 3 fins from each of the 3 stages together, till the fins for each stage were all identically sized. When each set of fins were sanded to be identical they were unpinned and the flat sides were all sanded smooth. Then all of the fins edges, with the exception of the glue edge, were sanded into compound angled edges to cut the air better. When mounting the fins on this, or any other, multistage rocket, I’ve found that it is best to do it while all of the stages are fitted together. I start with the last stage and work my way up the rocket. When all of the fins are secured to the last stage I move to the next progressive stage making sure each fin is lined up with the fin behind it. This makes for a very neat and precise appearance. It also insures that the rocket will have very stable flights. Once all of the fins were secured to the body tubes I go back and lay in glue fillets with a glue covered fingers. I make sure there are 3 good coats so that it is a good strong bond holding the fins on.
It’s crucial to get the engine mounts/tube couplers seated to the proper depths or else the stages of the rocket won’t fit together properly. The instructions do a good job of outlining the dimensions for the proper fit of these components. They should extend exactly 3/8ths of an inch from the body tubes.
In addition to being a multistage rocket the Microsonde also has a payload bay. The payload bay is a clear plastic tube slightly larger than the body tube. The nose cone and the reducer are plastic as well. These were assembled with a good quality clear plastic cement. Don’t use white or wood glue for these connections. The nose cone must be left unglued for access to the payload bay. If it is at all a loose fit, wrap the shoulder with clear scotch tape till it fits snug.
I completed assembly by gluing the shock cord in and then putting the parachute together. I decided to go with a multicolor paint job. The body and staging tubes were painted a bright metallic silver. The fins on the first stage were painted blue, the second stage fins are white, and the third stage sports fins that are red. The nose cone was painted red to match the third stage fins.
KIT FEATURES
This rocket kit comes with some nice features not found on many of the other MPC kits. It can attain heights as high as 2000 feet. The shock cord on the Microsonde 3 is an elastic one. It is threaded through 3 holes on a small rectangle of card stock and then glued into the body tube far enough in so that it will not interfere with the payload bay/nose cone. In addition this kit comes with a block of permanent fireproof wadding. Because the kit comes in a cardboard box, it doesn’t have the extra vacuum formed detailing parts that the kits that come in the plastic packaging do, It has plenty of waterslide decals to fill out all 3 stages. It has a 10inch 6 sided parachute and comes with a separate instruction sheet that has directions on how to set up the engines for multistage flights. It also comes with a count down and safety card, and like all other MPC kits it has a couple of “if found please return to” stickers.
The assembly of this rocket can be tedious and time consuming, but when it is built with patience and care it will be one of the nicest rockets in your collection. It’s not really that difficult to build. If you take your time, and line up the fins carefully with the fins on the previous stage, you will have one great looking, and performing rocket.
MPC Tomahawk
Skill 1 Length: 18.5” Dia: 20mm
THE KIT
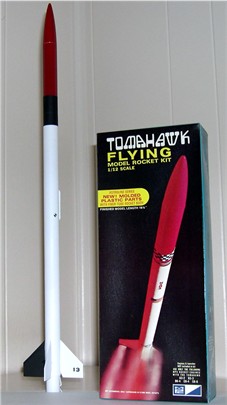
The MPC Tomahawk is another of the Astroline series of model rockets. It is a 1/12th scale replica of the TE-416 Tomahawk sounding rocket produced by the Astro-met division of the Thiokol Chemical Corporation. More than 40 of the TE-416 Tomahawks have been launched by NASA and the Atomic Energy Commission. They are a single stage solid fuel rocket that is a little over 17 feet long and 9 inches in diameter. At launch it weighs 661.1 pounds and can haul 130 pounds of scientific payload to over 50 miles above the earth.
The MPC Tomahawk model rocket is actually a version of the Thiokol TE-416 Tomahawk flown by the Sandia Corporation for the Atomic Energy Commission at the Tonopah, Nevada range.
Almost all model rocket kit manufactures have produced a scale version of the Tomahawk Sounding Rocket. This particular version of the Tomahawk model is still being produced by Quest Rockets today. Quest bought the molds when MPC folded some 30 years ago and their modern version is nearly identical to this original Tomahawk.
BUILDING IT
The assembly of the MPC Tomahawk is simple and quick due to its one piece plastic fin unit. You will need both plastic cement and white/wood glue. The engine compartment serves as both engine mount and tube coupler. It is assembled by gluing the engine block in to the forward end of the engine tube with white glue and then inserting the engine clip into a small slot that you cut into this tube just below the engine block. Once the engine block has dried, the engine compartment, with the clip, is glued, using plastic cement, into the plastic fin unit so that an inch or so of the engine compartment protrudes from the plastic fin unit. This serves as the tube coupler for the main 12 inch long body tube. Use white glue to join the protruding engine compartment to the main body tube.
To assemble the payload bay a plastic tube coupler with a plug is cemented into the 4 inch long body tube. For a functional payload bay do not glue the nose cone in place, but insure that it fits snugly into the 4 inch body tube section. Use scotch tape around the shoulder of the nose cone if it is a loose fit.
To finish assembly of the Tomahawk, mount the launch lug and shock cord to the main body tube, assemble the parachute, and attach the shock cord and parachute to the plastic tube coupler. Although the MPC box shows the Tomahawk decked out in a bright white and red paint job, the full sized TE-416 was done up in a gold and silver paint scheme with 2 black fins. This is how I opted to paint the one I’ve built.
KIT FEATURES:
The MPC Tomahawk has a 6 sided 10 inch parachute for recovery, and an elastic shock cord. Not all MPC kits have elastic shock cords and there doesn’t always seem to be any rhyme or reason as to why some do, and some do not. A standard MPC decal sheet is included with both NASA and Air Force insignia. However, the only markings on the full sized TE-416’s were a black stripe down its length, and a small block of numbers which denoted its contract and ID numbers. Like all MPC kits there is also a count down card and safety sheet and a small decal that you can write your name and contact info on in case you lose the rocket and someone else finds it and is good enough to want to return it.
No rocket collection is complete without a scale Tomahawk in it, and this is THE Tomahawk sport rocket to have. Since just about every model rocket kit manufacturer has produced a scale Tomahawk Sounding Rocket you can build quite a fleet just by collecting all of the various versions of this popular scale rocket.
THE KIT
The MPC Tomahawk is another of the Astroline series of model rockets. It is a 1/12th scale replica of the TE-416 Tomahawk sounding rocket produced by the Astro-met division of the Thiokol Chemical Corporation. More than 40 of the TE-416 Tomahawks have been launched by NASA and the Atomic Energy Commission. They are a single stage solid fuel rocket that is a little over 17 feet long and 9 inches in diameter. At launch it weighs 661.1 pounds and can haul 130 pounds of scientific payload to over 50 miles above the earth.
The MPC Tomahawk model rocket is actually a version of the Thiokol TE-416 Tomahawk flown by the Sandia Corporation for the Atomic Energy Commission at the Tonopah, Nevada range.
Almost all model rocket kit manufactures have produced a scale version of the Tomahawk Sounding Rocket. This particular version of the Tomahawk model is still being produced by Quest Rockets today. Quest bought the molds when MPC folded some 30 years ago and their modern version is nearly identical to this original Tomahawk.
BUILDING IT
The assembly of the MPC Tomahawk is simple and quick due to its one piece plastic fin unit. You will need both plastic cement and white/wood glue. The engine compartment serves as both engine mount and tube coupler. It is assembled by gluing the engine block in to the forward end of the engine tube with white glue and then inserting the engine clip into a small slot that you cut into this tube just below the engine block. Once the engine block has dried, the engine compartment, with the clip, is glued, using plastic cement, into the plastic fin unit so that an inch or so of the engine compartment protrudes from the plastic fin unit. This serves as the tube coupler for the main 12 inch long body tube. Use white glue to join the protruding engine compartment to the main body tube.
To assemble the payload bay a plastic tube coupler with a plug is cemented into the 4 inch long body tube. For a functional payload bay do not glue the nose cone in place, but insure that it fits snugly into the 4 inch body tube section. Use scotch tape around the shoulder of the nose cone if it is a loose fit.
To finish assembly of the Tomahawk, mount the launch lug and shock cord to the main body tube, assemble the parachute, and attach the shock cord and parachute to the plastic tube coupler. Although the MPC box shows the Tomahawk decked out in a bright white and red paint job, the full sized TE-416 was done up in a gold and silver paint scheme with 2 black fins. This is how I opted to paint the one I’ve built.
KIT FEATURES:
The MPC Tomahawk has a 6 sided 10 inch parachute for recovery, and an elastic shock cord. Not all MPC kits have elastic shock cords and there doesn’t always seem to be any rhyme or reason as to why some do, and some do not. A standard MPC decal sheet is included with both NASA and Air Force insignia. However, the only markings on the full sized TE-416’s were a black stripe down its length, and a small block of numbers which denoted its contract and ID numbers. Like all MPC kits there is also a count down card and safety sheet and a small decal that you can write your name and contact info on in case you lose the rocket and someone else finds it and is good enough to want to return it.
No rocket collection is complete without a scale Tomahawk in it, and this is THE Tomahawk sport rocket to have. Since just about every model rocket kit manufacturer has produced a scale Tomahawk Sounding Rocket you can build quite a fleet just by collecting all of the various versions of this popular scale rocket.
MPC Nike Patriot
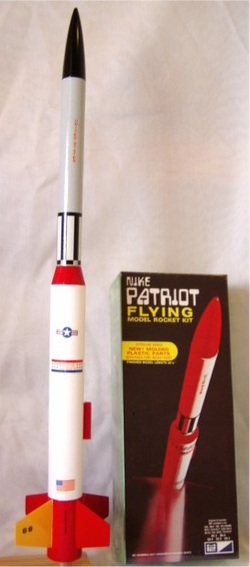
Skill 1 Length: 22.5” Dia: 35mm
THE KIT
This vintage rocket kit is one of the Astroline series of MPC rockets. It still lives on today as the Quest Nike-K rocket kit.
BUILDING IT
The Nike Patriot is a fairly easy rocket to build. It has a one piece plastic fin assembly that houses the engine mount. The engine mount was at the time, a new “breakthrough” for MPC which used 2 plastic centering rings that snapped onto the T-19 fiber engine mount tube and wire engine clip. This completed assembly is then glued into the one piece plastic fin assembly with plastic cement.
The nose cone and the launch lug are also plastic, as is a 35mm to 25mm tube reducer/coupler. The shock cord connects to the rear of the reducer/coupler plug. The nose cone can be glued to the top of the 25mm body tube or as an option it can be left unglued so that the 25mm tube can be used as a payload bay. This is how I opted to build it. Since all of the major components are plastic, Plastic cement is all that’s needed to glue everything together.
The plastic fin assembly has two holes in the top where it mounts to the 35mm body tube. Instead of gluing the shock cord to the inside of the body tube with a piece of card stock., which is the MPC method, I decided to go with the Quest method of tying the shock cord into one of the holes in the fin assembly. This is a much stronger and more reliable means of connecting the two halves of the rocket together.
The parachute is easy to assemble but a drop of glue should be used on the shroud tabs to secure them better. This kit included a snap swivel for attaching the chute to the rocket.
KIT FEATURES:
The MPC Nike Patriot sports a large 14 inch 8 sided parachute for gentle recoveries. It features a one piece plastic fin assembly, plastic nose cone, and plastic reducer/coupler for very easy and quick construction. It comes with a count down card and a “return to” address label.
This is a great semi scale rocket design which has been in production for over 30 years.
